 Installation & Licensing Center
Ansys Download & Installation Guide (Start Here!)
![]() Authored by Caleb Scharf
November 4th, 2025
96770 views
73 likes
Authored by Caleb Scharf
November 4th, 2025
96770 views
73 likes
![]() KB944018
KB944018
Description
You can't take shortcuts when installing Ansys! Sequentially following each & every step in this guide will ensure a successful install of Ansys each time!
Flagship Products
Part #1 - License Server Setup
Skip this step if…
You should skip this step if your company has already deployed & configured a license server unless you are using a FlexNet license server, in which case you must verify the License Manager is running the same or new version than the client software being used, OR you need to install a newly issued FlexNet License File.
FlexNet License Server - Windows
I don't know what type of License Server I need/have
- FlextNet - Classic, self-hosted license server where one or more users share a pool of licenses. (currently most common)
- Shared Web Licensing - Newer option, hosted by Ansys, where one or more users share a pool of licenses.
- Elastic Web Licensing - License Server hosted by Ansys using their flexible pay-per-use licensing model based on AEC's.
For more information, please visit - Understanding Ansys License Server Types
Step #1 - Determine Deployment Method
.png) |
.png) |
- You must determine what computer will be your License Server. Your licenses will be keyed to this and only this machine.
- In multi-user deployments, the license manager should be installed on a dedicated computer and NOT on the client computer.
Step #2 - Obtain Your License File
Note:
This step is only required if you need to install a new license file. Existing license files remain in place when upgrading the software.
-
Obtain Your Ansys License File and have it on hand.
Step #3 - Download & Install / Upgrade the License Manager
How do I upgrade the License Manager?
- The steps to install and upgrade the license manager software are the same.
- If upgrading, the existing license file (& option file if applicable) will remain and a license does not need to be installed unless you have received a newer license.
- It is not possible to run multiple versions of the license manager on the same machine.
-
Check & Whitelist Endpoint / AV Security software
- Many endpoint security applications can silently corrupt an Ansys installation by blocking installation steps or prevent the application from opening, or both.
- Review this list for known problematic security software.
- Whitelist the security software prior to installation if it is on this list.
-
Access the computer your license manager was issued to
- The following steps must be performed on the computer that your license file was issued to when you Gathered License Server Host Info.
- You cannot run the License Manager successfully on any machine other the one it was issued to.
-
Download the latest version of the Ansys License Manager
- Download Here (2025 R2 / 10-14-2025)
- The latest version is backward compatible with all previous versions and license files.
-
Prepare the Installation Files
- Unzip the file:
-
Right click the file > select Extract All. (If the setup file is run without unzipping the archive file first, the installation will appear to complete successfully, but the program will not function properly)
-
Right click the file > select Extract All. (If the setup file is run without unzipping the archive file first, the installation will appear to complete successfully, but the program will not function properly)
- Unzip the file:
Don't miss these steps!
 |
 |
* Skipping these steps won’t always produce error messages during the installation, but unfortunately can still corrupt the install and cause various software errors and force you to uninstall and reinstall.
-
Install the Software
- Once the file has been unzipped, right click the setup.exe file > Run as Administrator
Note: Be aware that the license manager will be stopped during the installation and clients will not be able to communicate with the license server during this time. The installation typically takes ~ 5min. - Follow the prompts to complete the installation. Default values are recommended unless there is a specific reason that requires otherwise.
- Upon completing the installation, the License Management Center web page will open.
- Once the file has been unzipped, right click the setup.exe file > Run as Administrator
-
Add Required Firewall Exceptions
Note: You may skip this step for Single User/Machine Deployments- You must add firewall exceptions to your firewall in order for other client computers to communicate with your license server.
Step #4 - Install your License File(s)
Do I need to upgrade my License Manager if I'm only installing a new license?
You should always use the latest version of the License Manager. Outdated License Manager Software is a very common cause of license checkout related issues. Newer versions of the license manager are always backward compatible.
- Install Your License File(s)
- Set a static Vendor Daemon Port
-
Communicate License Server Name to Your Users
- They will need to specify the server name (not IP address) in the client license settings.
- Send all users these instructions along with your server name.
FlexNet License Server - Linux
Step #1 - Determine Deployment Method
- You must determine what computer will be your License Server. Your licenses will be keyed to this and only this machine.
- In multi-user deployments, the license manager should be installed on a dedicated computer and NOT on the client computer.
.png) |
.png) |
Step #2 - Obtain Your License File
- If you haven't already obtained your license file, please do so now.
What if I'm only upgrading the License Manager Software?
If you only upgrading and do not need to install a new license file, the existing license file will remain installed and you do not need to perform this step.
Step #3 - Download & Install / Upgrade the License Manager
These steps must be performed on the computer that your license file was issued to when you Gathered License Server Host Info.
Upgrading?
- The steps to install and upgrade the license manager software are the same.
- If upgrading, the existing license file (& option file if applicable) will remain and a license does not need to be installed unless you have received a newer license.
- A client cannot checkout a license from a server running a version older than the client software. In this case, the license server must be updated to the newest version.
- It is not possible to run multiple versions of the license manager on the same machine.
- Install Required Linux Packages & Libraries
-
Download the latest version of the Ansys License Manager
- Download Here (2025R1 / 2-4-2025)
- The latest version is backward compatible with all previous versions and license files.
-
Prepare the Installation Files
- Unzip the file:
-
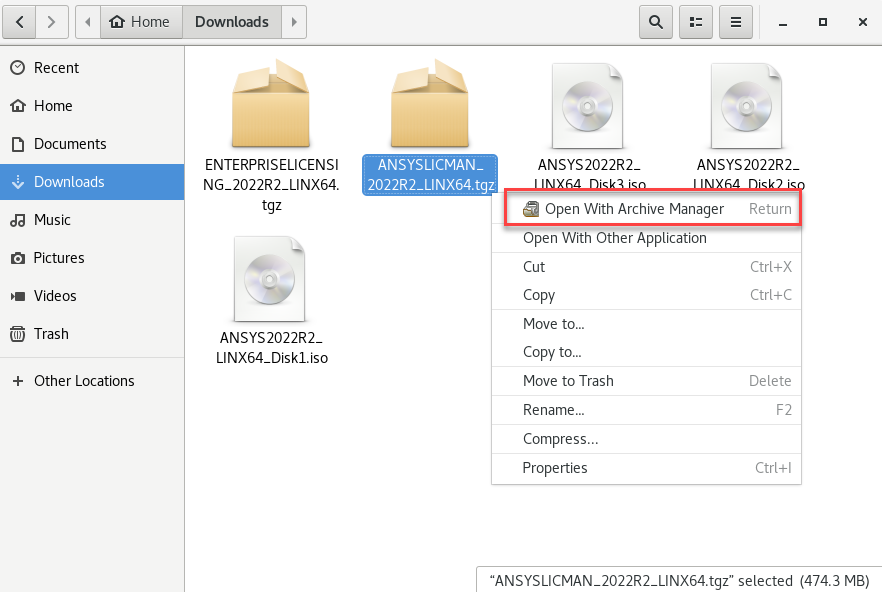
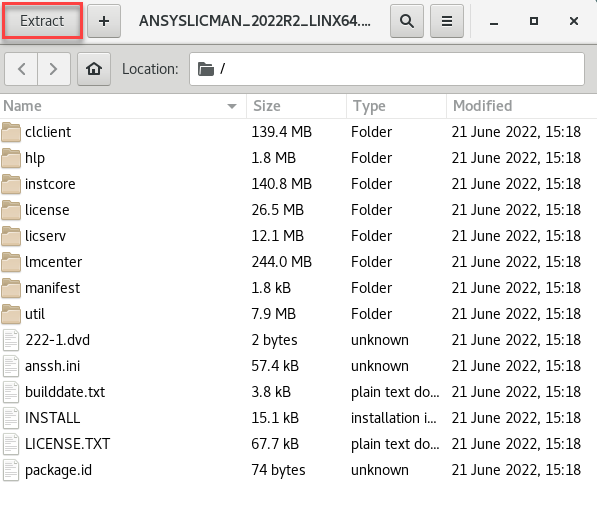
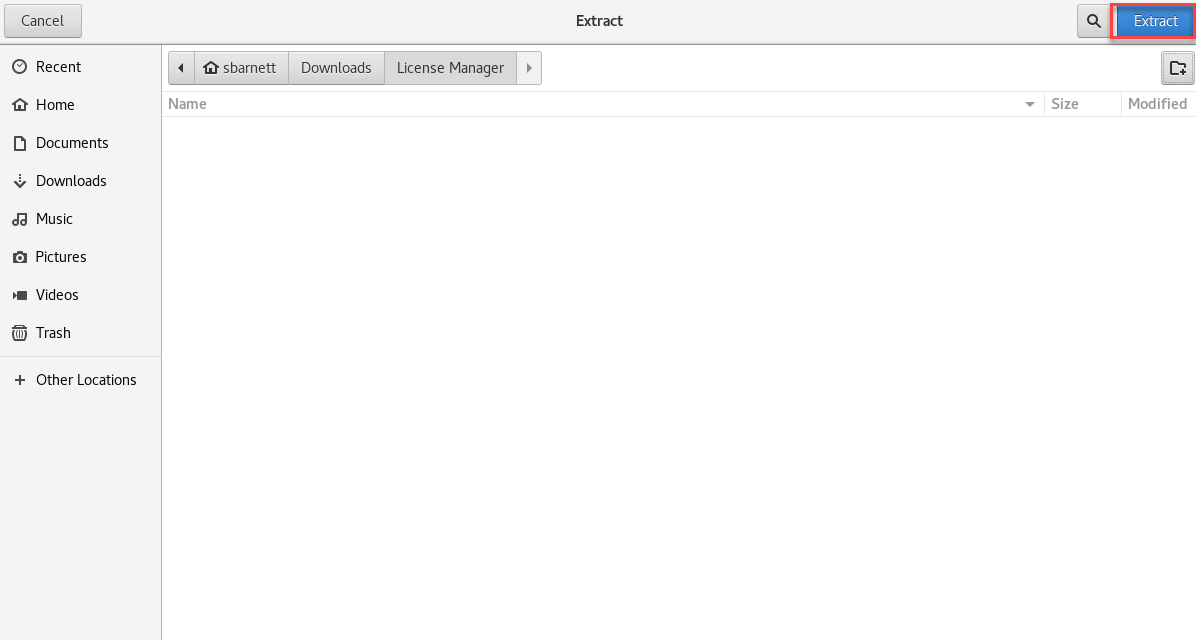
Right click the file > select Open with Archive Manager > Extract > select the desired folder to extract the files > Extract
-
Right click the file > select Open with Archive Manager > Extract > select the desired folder to extract the files > Extract
- Unzip the file:
-
Install the Software
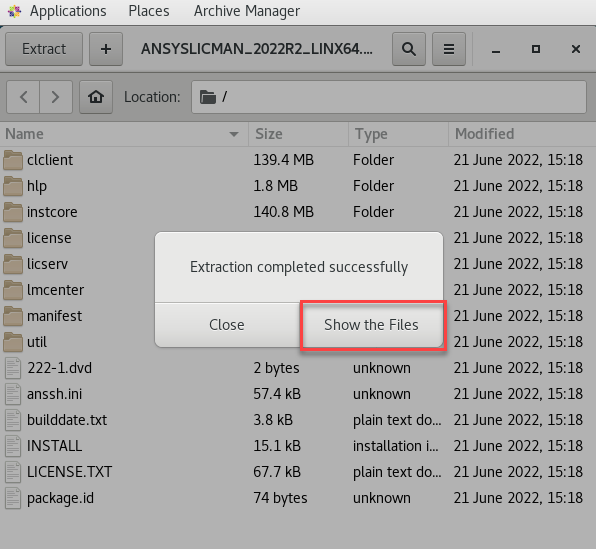
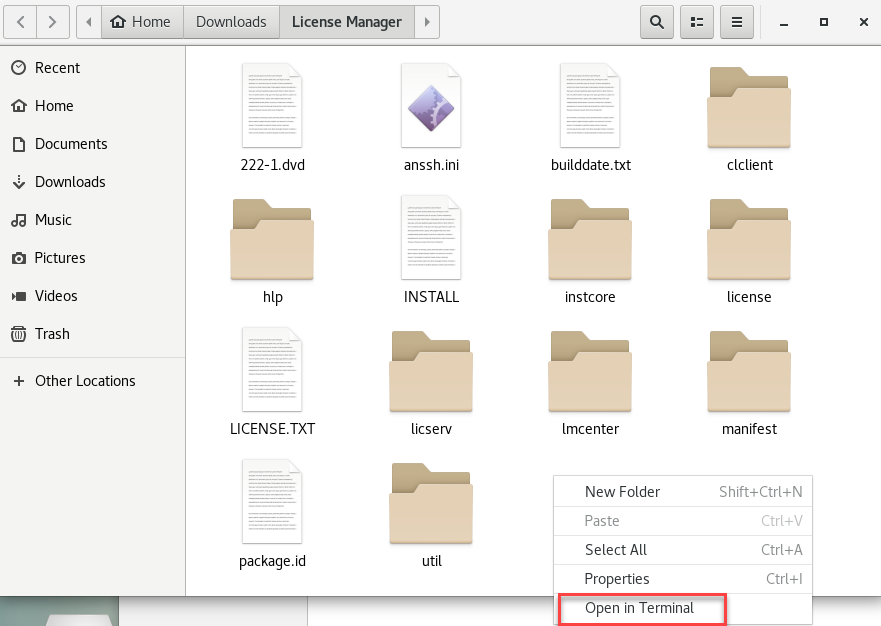
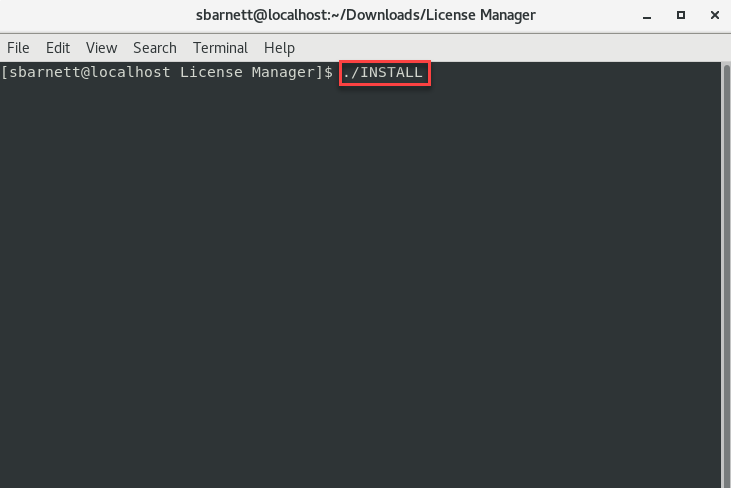
- Once the files have been extracted > select Show the Files > Right click in the blank folder space, not a file > select Open in Terminal > type the install command: [user@ localhost folder]$ ./INSTALL
- Follow the prompts to complete the installation. Default values are recommended unless there is a specific reason that requires otherwise.
- Upon completing the installation, the License Management Center web page will open:
- Once the files have been extracted > select Show the Files > Right click in the blank folder space, not a file > select Open in Terminal > type the install command: [user@ localhost folder]$ ./INSTALL
-
Add Required Firewall Exceptions
Note: You may skip this step for Single User/Machine Deployments- You must add firewall exceptions to your firewall in order for other client computers to communicate with your license server.
Step #4 - Install your License File(s)
Do I need to upgrade my License Manager if I'm only installing a new license?
You should always use the latest version of the License Manager. Outdated License Manager Software is a very common cause of license checkout related issues. Newer versions of the license manager are always backward compatible.
- Install Your License File(s)
- Set a static Vendor Daemon Port
-
Communicate License Server Name to Your Users
- They will need to specify the server name (not IP address) in the client license settings.
- Send all users these instructions along with your server name.
Part #2 - Client Software Installation
Windows
Do I need to upgrade my License Manager?
Yes, we always recommend running the latest version of the License Manager because we have found that outdated versions are a very common cause of license checkout issues. Strictly speaking, the LM must be the same or newer version than the client software being used. Newer versions of the license manager are always backward compatible.
Step #1 - Download the Client Software
Select Your Installer Type - 3 Options
-
Primary Packages (Recommended Method)
- Best option if you only need to install 1-2 software titles
- Single Zip File (up to ~15GB)
- Service Packs need to be installed separately
-
ISO Images
- Best option if you need to 3+ software titles
- Includes all flagship software titles (excluding electronics)
- Downloads all Software titles - 50GB of data
- 7+ iso files require the installation process to be interrupted 7 times to specify the path of the next ISO file.
- Service Packs need to be installed separately
-
Automated Installer (NOT RECOMENDED / Unreliable)
- Download times can take up to 12+hrs and installations sometimes get hung up or are buggy.
- 50MB Initial Download - Downloads files (15-50GB) during installation wizard
- Ansys Account is required during the install
- Installs service packs with installation
Primary Packages & ISO Images
-
Login to the Ansys Download Center
-
https://download.ansys.com/currentReleases
- If you do not yet have an Ansys Account, you will be prompted to sign-up for an account.
- You must use your corporate email address
- Can't access the Download Page?
-
https://download.ansys.com/currentReleases
-
Download Client Software Package of your choice

Step #2 - Install Client Software
I'm installing new/multiple versions of the software
- Installing a newer version of the client software does not remove older versions. All versions installed on a computer can be used simultaneously.
- If multiple versions of Ansys need to be installed, the most recent version must be installed last, otherwise Ansys licensing & checkout will not work properly. If you need to install an older version and already have a newer version installed, reinstall the latest version after installing the older version(s).
-
Check & Whitelist Endpoint / AV Security software
- Many endpoint security applications can silently corrupt an Ansys installation by blocking installation steps or prevent the application from opening, or both.
- Review this list for known problematic security software.
- Whitelist the security software prior to installation if it is on this list.
-
Prepare the Installation Files
-
If you downloaded a Primary Package / Zip File:
- Unzip the file by right clicking it and selecting Extract All. (If the setup file is run without unzipping the file first, the installation will appear to complete successfully, but the program will not function properly)
-
If you downloaded the ISO Images:
- Double click the Disc 1 ISO file. This will mount it as a virtual DVD drive in Windows 10.
- Browse to and double click all other ISO files, this will mount them as an additional virtual DVD drive. (Take note of the drive letter is used for each disk as this will be used later)
-
If you downloaded a Primary Package / Zip File:
-
Install the Software
Don't miss these steps!
 |
 |
* Skipping these steps won’t always produce error messages during the installation, but unfortunately can still corrupt the install and cause various software errors and force you to uninstall and reinstall.
- Right-click the setup.exe file found with your installation files and select Run as Administrator.
- When prompted, specify the name of the license server you will be using.
- Follow the installation wizard, selecting the software packages applicable to you.
- Allow the installation to complete. This normally takes anywhere from 10-30 min, depending on how many applications you are installing and the speed of the computer.
-
Specify a License Server
- Lastly, Specify a License Server to connect to if you did not do so during the installation wizard.
- If you can't checkout licenses, see HOW TO - Test & Fix License Manager Connectivity Issues
Step #3 - Install Service Packs (Recommended)
How do I know when service packs are released?
INFO - Signup for Ansys Service & Service Pack Notifications
- Visit the Ansys Software Download Center
- If the version you have installed has service packs available, they will be listed at the bottom of the download page as seen below.
Note:
Service packs are cumulative, meaning, you only need to install the latest version.

Linux
Do I need to upgrade my License Manager?
Yes, we always recommend running the latest version of the License Manager because we have found that outdated versions are a very common cause of license checkout issues. Strictly speaking, the LM must be the same or newer version than the client software being used. Newer versions of the license manager are always backward compatible.
Step #1 - Download the Client Software
Select Your Installer Type - 3 Options
-
Primary Packages (Recommended Method)
- Best option if you only need to install 1-2 software titles
- Single Zip File (up to ~15GB)
- Service Packs need to be installed separately
-
ISO Images
- Best option if you need to 3+ software titles
- Includes all flagship software titles (excluding electronics)
- Downloads all Software titles - 50GB of data
- 7+ iso files require the installation process to be interrupted 7 times to specify the path of the next ISO file.
- Service Packs need to be installed separately
-
Automated Installer (semi-reliable)
- 50MB Initial Download - Downloads files (15-50GB) during installation wizard
- Download times can vary greatly and installations sometimes get hung up or are buggy
- Ansys Account is required during the install
- Installs service packs with installation
Primary Packages & ISO Images
-
Login to the Ansys Download Center
-
https://download.ansys.com/currentReleases
- If you do not yet have an Ansys Account, you will be prompted to sign-up for an account.
- You must use your corporate email address
- Can't access the Download Page?
-
https://download.ansys.com/currentReleases
-
Download Client Software Package of your choice

Step #2 - Install Client Software
I'm installing new/multiple versions of the software
- Installing a newer version of the client software does not remove older versions. All versions installed on a computer can be used simultaneously.
- If multiple versions of Ansys need to be installed, the most recent version must be installed last, otherwise Ansys licensing & checkout will not work properly. If you need to install an older version and already have a newer version installed, reinstall the latest version after installing the older version(s).
- Install Required Linux Packages & Libraries
- Install Client Software
Step #2b - Install Electromagnetics (if applicable)
Step #3 - Install Service Packs (Recommended)
If the version you have installed has any available service packs, they will be listed at the bottom of the Ansys Software Download Center. Service packs are cumulative, and you only need to install the latest version.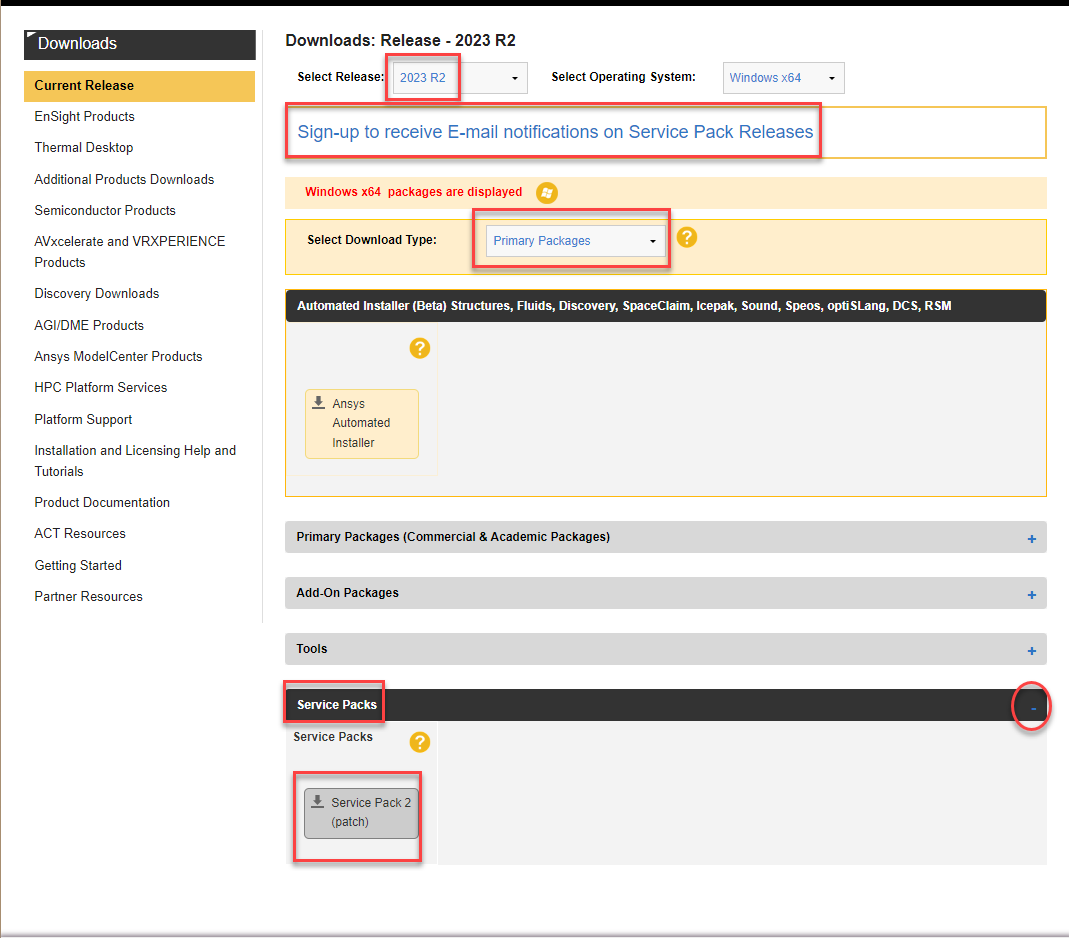
How do I know when service packs are released?
INFO - Signup for Ansys Service & Service Pack Notifications
Other / Legacy Products
Thermal Desktop, nCode, LSTC Software, ESSS Rocky, MotorCAD, Lumerical
Windows
Thermal Desktop
- Install AutoCAD:
- Install Thermal Desktop
nCode - 2021 R2 & Later
Installing Ansys nCode can vary depending on the version you need. In 2021 R2, it is bundled with the Ansys suite and no longer requires a separate download.
- Follow Steps #1-3 above for Flagship Ansys Products.
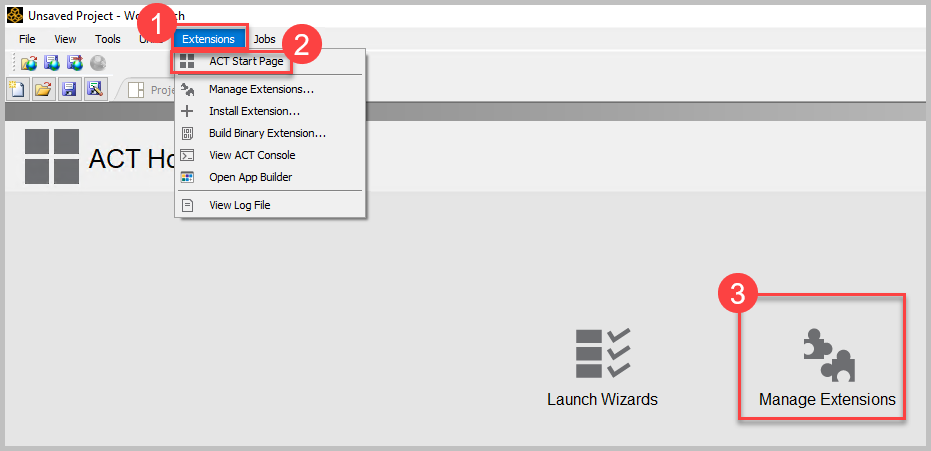
- In Workbench, click on Extensions > ACT Start Page > Manage Extensions
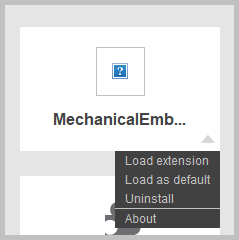
- Find the MechanicalEmbeddedDesignLife extension in the list, then click the down arrow and Load as Default
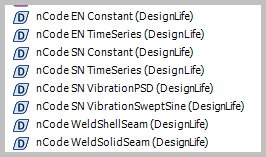
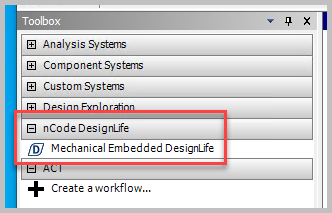
- When returning to the project, you'll see nCode DesignLife in the Toolbox
nCode - 2021 R1 & Prior
Info
These instructions are written using 2021 R1 as an example and uses the corresponding file names, please find the appropriate file names for your version.
- Follow Steps #1-3 above for Flagship Ansys Products.
- In the Ansys Customer Portal, download the nCode package from the Add-On Packages section.
Info
For more information about accessing the Ansys Customer Portal, check out Accessing the Ansys Customer Portal
- Extract NCODE_2021R1_WINX64.zip, and open the resulting NCODE_2021R1_WINX64 folder
- Extract the nCode2020P1_Ansys2021R1_Release_Build350_Win64.zip folder, and open the resulting folder
- Right click on setup.exe and choose Run as Administrator
- Click Next through the wizard to agree to the license terms, choose a language, and then click Install to start the installation.
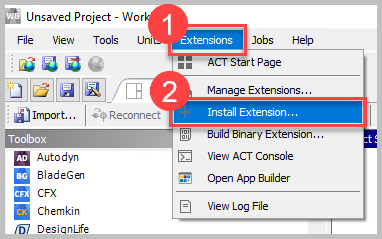
- Open Ansys Workbench, and click on Extensions > Install Extension
- Navigate to the NCODE_2021R1_WINX64 folder, and select the MechanicalEmbeddedDesignLife.wbex, and choose Open.
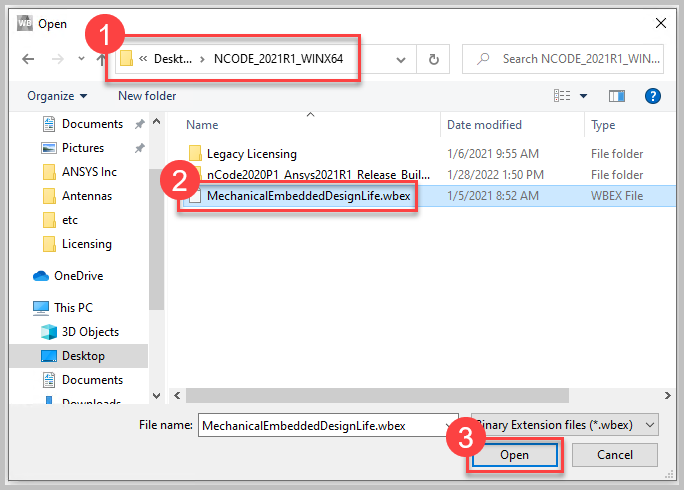
- In Workbench, click on Extensions > ACT Start Page > Manage Extensions

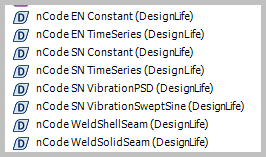
- Find the MechanicalEmbeddedDesignLife extension in the list, then click the down arrow and Load as Default

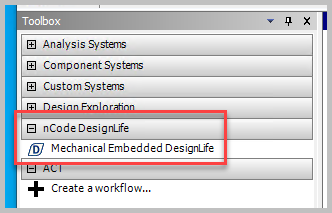
- When returning to the project, you'll see nCode DesignLife in the Toolbox
LSTC Software - LS-Dyna & Others
-
Download & Install the License Manager
- These steps must be performed from the computer which will be your license manager.
- Follow LSTC License Manager Download & Installation Instructions
- Make sure you right click the installation file and select Run as Administrator.
- FTP Credentials
- Username: user
- Password: computer
-
Download & Install the Client Software
- Follow LSTC Download and Installation Instructions
- FTP Credentials
- Username: user
- Password: computer
ESSS Rocky (Legacy)
-
Receive Welcome Email with License File
- This will enable your access to the ESSS Customer Portal
- Sign In to the ESSS Customer Portal

-
Install the License Manager
- Navigate to Technical Content > ROCKY > Installation & Setup
https://support.esss.com/hc/en-us/sections/115000722246-Installation-Setup - Follow “Install and Configure FlexLM Server” (Windows) document.
- Navigate to Technical Content > ROCKY > Installation & Setup
-
Install the Rocky client application
- Follow “How to Install” (Windows) document in the customer portal
MotorCAD
When installing MotorCAD, you may receive a message like this:

Click More Info and then Run Anyway (if you are not getting the option to Run Anyway, be sure you are running the installer with Run As Administrator rights.)
When running the installer, you will be prompted to choose a license type. Choose Ansys and specify your license server. (If you do not know your license server, choose Do not setup / Specify Later.)
Lumerical
-
Download and install the Ansys License Manager
a. Follow Ansys license manager installation guide for Windows -
Download and install client software
a. If you have Microsoft Visual Studio already installed, do not install Intel MPI and follow the advanced installation process
b. If you do not have Microsoft Visual Studio already installed, you will need follow the default installation or the custom installation option
Linux
LSTC Software - LS-Dyna & Others
-
Download & Install the License Manager
- These steps must be performed from the computer which will be your license manager.
- Follow LSTC License Manager Download & Installation Instructions
- Make sure you right click the installation file and select Run as Administrator.
- FTP Credentials
- Username: user
- Password: computer
-
Download & Install the Client Software
- Follow LSTC Download and Installation Instructions
- FTP Credentials
- Username: user
- Password: computer
ESSS Rocky (Legacy)
-
Receive Welcome Email with License File
- This will enable your access to the ESSS Customer Portal
- Sign In to the ESSS Customer Portal

-
Install the License Manager
- Navigate to Technical Content > ROCKY > Installation & Setup
https://support.esss.com/hc/en-us/sections/115000722246-Installation-Setup - Follow “Install and Configure FlexLM Server” (Windows) document.
- Navigate to Technical Content > ROCKY > Installation & Setup
-
Install the Rocky client application
- Follow “How to Install” (Linux) document in the customer portal
Lumerical
- Download and install the Ansys license manager
a. First follow Required libraries for the Ansys license manager on Linux
b. Follow Ansys license manager installation guide for Linux
c. To uninstall, follow Uninstalling the Ansys license manager -
Download and install the client software
a. Install the pre-requisites, follow Required libraries for Ansys Lumerical on Linux
b. For RHEL/CentOS, follow RHEL/CentOS Linux installation guide
c. For SUSE, follow SUSE Linux Enterprise Server installation guide
d. For Ubuntu, follow Ubuntu Linux installation guide
Solutions to Common Errors
- Did you extract the zip files and right click the setup.exe and select Run as Administrator? If you're unsure, go back and do so.
- Search our KB for solutions to 100+ common error messages
- HOW TO - Test & Fix License Manager Connectivity Issues
- HOW TO - Verify Licenses Can be Checked Out
- Comprehensive Reinstall of Ansys
- Ansys Troubleshooting Guide